9. Importing Data
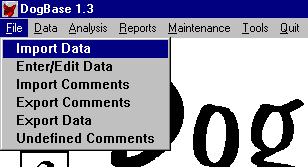
After you have downloaded data from your data provider, you need to bring that data into DogBase. It is this process that begins building your historical database. This is done by selecting File from the DogBase main screen and clicking on "Import Data". This process examines the data downloaded and begins placing it in the files for later analysis and forecasting.
When you request the computer to import data, you will be presented a window that will ask for which track to import data as well as the from and to dates of the data to be imported.
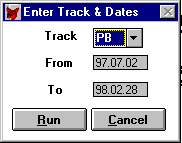
When the prompt window is presented, the computer will have already selected the default track.You may change this track ID by clicking the down arrow on the right of the track ID in the window.This will give you a list of the active tracks. The From date will default to last date the computer has results for the track or blank if no results are present. The To date will default to the current date plus two days. Once the track ID and the dates from and to are completed, click on Run.
As the computer’s import processes a downloaded file, it will encounter abbreviations it does not know. On each unknown abbreviation, it will ask for an explanation. Once taught that abbreviation, the computer will no longer ask for that code’s description again.
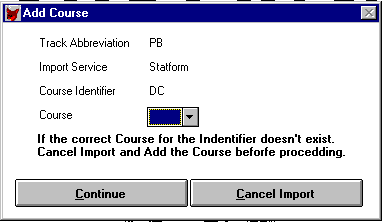
In this case the computer did not know the course identifier in track PB. The Course Identifier was DC. The course as we want it to be known will be DC (also). Select the course by clicking the down arrow next to the course filed. Be CAREFUL, courses must be setup in advance.When Course has been filled in, click on Continue key. The computer will continue with the next code it does not know. In our case the next code to be defined is the grade for the course for the track.
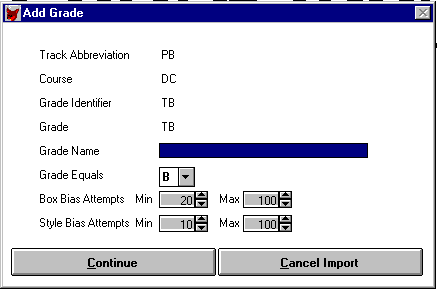
In this example the grade identifier the computer found is "B". The name is "Grade B". The Grade equals code has a list of choices that you can search through and select by clicking on the down arrow on the Grade Equals line. Other fields can be left alone at this point. For a better explanation of how track grades are stored and used, see the section on "Things to Know Before Beforehand" earlier in the documentation. Click Continue when all this data is correct for the grade. The computer may ask for other grades as they are imported. Once imported and defined you will not be asked to define that code again.
All Kennel Identifiers used will need to be defined.
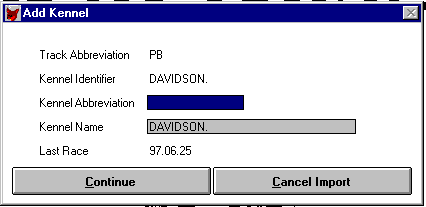
In this example, the first undefined identifier code is DAVIDSON. Therefore the Kennel Abbreviation and Name for this identifier is "DAVIDSON". Click on Continue when both fields have been filled in. You can see in this example how an identifier is defined with a Kennel Abbreviation and Name. Click Continue when this code has been entered properly. You may also have to define a Blank kennel for dogs that are not assigned to a kennel yet. When the Kennel Identifier is empty, I use the word 'BLANK' for the Kennel Abbreviation and 'Blank Kennel' for the Kennel Name.
Comments are a major part of the DogBase system. As each new comment is encountered, the computer will attempt to define the comment and store its results for your review. Once the computer has finished importing the data, you will be presented with the Undefined Comment Screen.
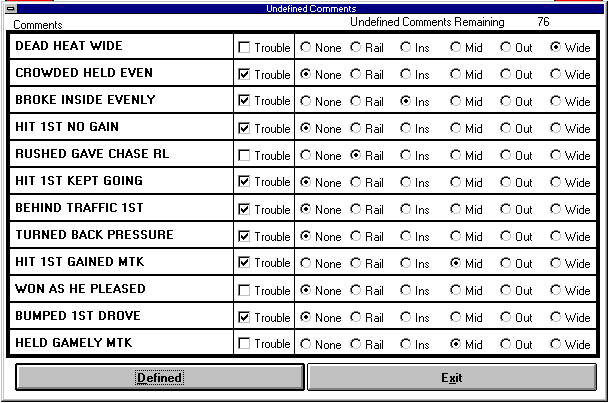
This screen allows you to review and change the comments definition. Once you have reviewed or changed the comments. Press the Defined button to see the next set of comments. Once you have finished defining the comments, press the Exit button to finish the import process. Congratulations, you now have historical data on your computer with which you may begin working.
Return to the DogBase 1.3 Manual - Table of Contents
Copyright © 1998 DogBase, Inc. All Rights Reserved.
Last Updated 03/05/98